Table of contents
Estimated reading time: 9 minutes
What Are Butterfinger Balls?
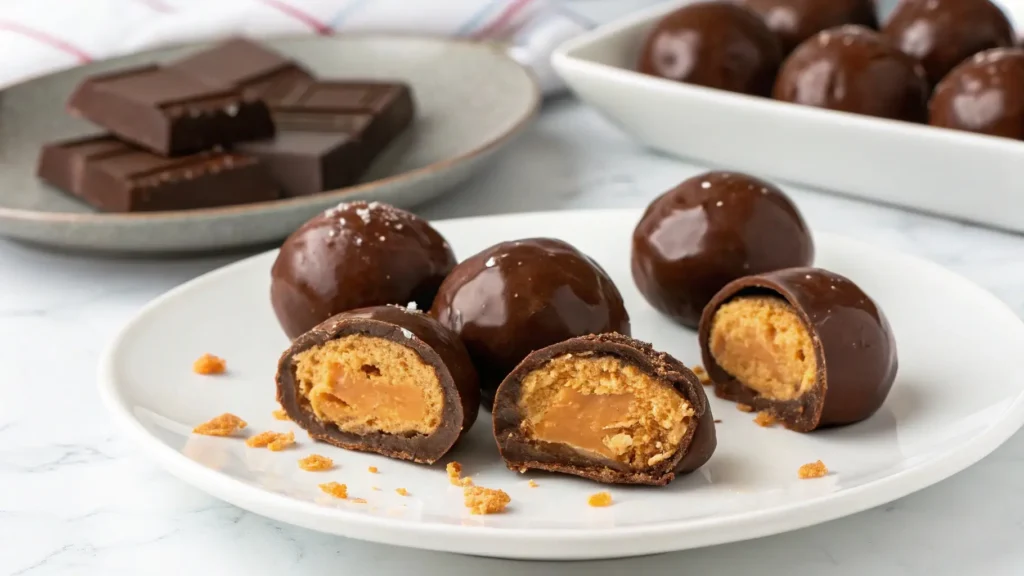
Butterfinger balls are a delightful, bite-sized treat that combines the irresistible crunch of Butterfinger candy with creamy, rich ingredients to create the ultimate no-bake dessert. Perfect for parties, holiday gatherings, or a quick indulgence, these small, flavorful snacks are incredibly simple to prepare, making them a favorite among dessert lovers.
The magic of Butterfinger balls lies in their combination of textures and flavors. Each bite offers a satisfying mix of sweet, salty, and nutty notes, all wrapped in a soft, melt-in-your-mouth center. They require minimal ingredients, most of which are pantry staples, ensuring anyone can whip up a batch with ease.
These treats have grown in popularity for their versatility, as they can be customized to suit different preferences. Whether you’re adding a drizzle of chocolate, incorporating nuts, or rolling them in crushed candy, Butterfinger balls offer endless possibilities. They are also an excellent choice for those who prefer quick recipes without compromising on taste or presentation.
For more no-bake dessert inspiration, check out this “Oreo Lava Cake Crockpot with Candy Bar Recipe“, another indulgent treat that’s simple to prepare.
With their small size and vibrant flavor, Butterfinger balls are an ideal option for dessert tables, gift boxes, or simply satisfying your sweet cravings. Their ease of preparation and unique taste make them a standout among homemade desserts. In the following sections, we’ll explore the ingredients, step-by-step preparation, and creative variations of these delicious bites.
Key Ingredients for Butterfinger Balls
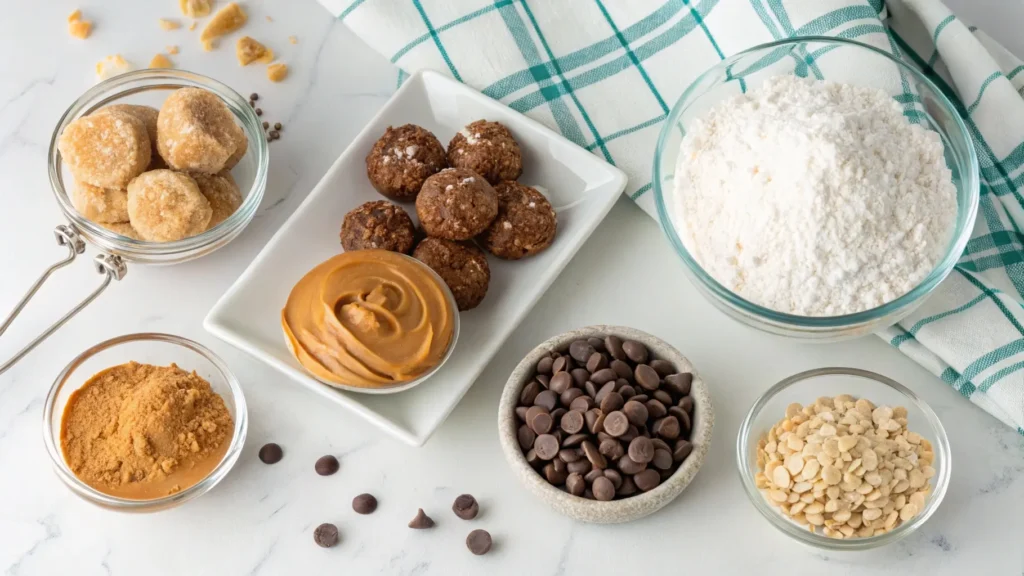
To craft the perfect batch of Butterfinger balls, you only need a handful of simple ingredients that come together to create a flavorful and creamy dessert. Each component plays a key role in delivering the signature taste and texture of these no-bake treats. Here’s what you’ll need:
1. Crushed Butterfinger Candy Bars
The star ingredient of this recipe, Butterfinger candy bars, provides the signature crunchy texture and bold peanut butter flavor. Be sure to crush them finely, as this ensures every bite of the balls has the perfect blend of sweetness and crunch.
2. Creamy Peanut Butter
Peanut butter serves as the binding ingredient in the recipe, bringing everything together while enhancing the nutty flavor profile. Smooth peanut butter is ideal for creating a silky texture in the mixture.
3. Powdered Sugar
Powdered sugar adds sweetness and helps to thicken the mixture, ensuring the Butterfinger balls hold their shape. Its fine texture blends seamlessly with the other ingredients.
4. Butter or Margarine
A small amount of softened butter adds richness to the recipe while providing structure to the mixture. It balances the sweetness of the other ingredients.
5. Chocolate for Coating
Melted chocolate is optional but highly recommended. A smooth chocolate coating not only enhances the visual appeal but also adds another layer of flavor, complementing the crunchy Butterfinger candy.
Additional Optional Ingredients:
- Vanilla Extract: For a subtle depth of flavor.
- Sprinkles or Crushed Nuts: To roll the finished balls for extra texture and a decorative touch.
- Coconut Flakes: For a unique twist that adds a tropical vibe.
Each of these ingredients contributes to the delightful combination of flavors and textures that make Butterfinger balls a favorite dessert option.
Step-by-Step Guide to Making Butterfinger Balls
Creating Butterfinger balls is quick and straightforward, requiring no baking and minimal prep time. Follow these simple steps to whip up a batch of these delicious treats:
Gather Your Ingredients
Ensure you have all the key ingredients on hand, including crushed Butterfinger candy bars, creamy peanut butter, powdered sugar, softened butter, and melted chocolate (optional).
Crush the Butterfinger Candy
Place the Butterfinger candy bars in a sealed plastic bag and crush them using a rolling pin until finely crumbled. Alternatively, use a food processor for faster results.
Combine the Base Ingredients
In a large mixing bowl, combine the crushed Butterfinger candy, peanut butter, powdered sugar, and softened butter. Mix thoroughly using a spatula or your hands until the ingredients form a thick, dough-like consistency.
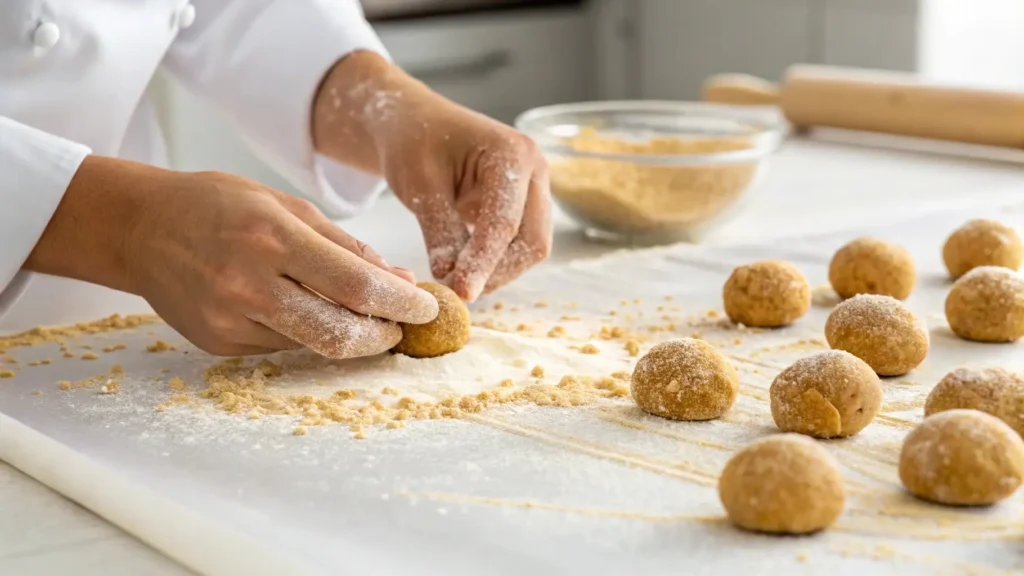
Shape the Mixture into Balls
Scoop out small portions of the mixture (about 1–2 tablespoons) and roll them into bite-sized balls using your palms. Place the balls on a baking sheet lined with parchment paper.
Chill the Balls
Refrigerate the Butterfinger balls for 20–30 minutes to firm up and hold their shape.
Add a Chocolate Coating (Optional)
If desired, dip the chilled balls into melted chocolate and place them back on the parchment paper. Allow the chocolate to set by returning them to the refrigerator for another 10–15 minutes.
Once chilled, your Butterfinger balls are ready to enjoy! Store them in an airtight container for up to a week.
Pro Tips for Perfect Butterfinger Balls
Creating the perfect Butterfinger balls is easy when you follow these expert tips. From enhancing flavors to ensuring the right texture, these suggestions will help elevate your no-bake treats to the next level.
1. Crush the Butterfinger Candy Properly
- Use a food processor for even, fine crumbs, which blend better into the mixture.
- For a more rustic texture, hand-crush the candy using a rolling pin. This leaves some larger pieces for added crunch.
2. Choose the Right Peanut Butter
- Opt for creamy peanut butter, as it binds the mixture more smoothly.
- Avoid natural peanut butter with oil separation, as it can affect the consistency of the balls.
3. Adjust the Sweetness
- If you prefer a less sweet treat, reduce the amount of powdered sugar slightly. The Butterfinger candy already adds plenty of sweetness.
4. Chill Before Rolling
- If the mixture feels too sticky, refrigerate it for 10–15 minutes before rolling into balls. This makes it easier to handle and shape.
5. Customize the Coating
- For an eye-catching presentation, roll the balls in crushed nuts, sprinkles, or coconut flakes before the chocolate sets.
- Dark chocolate or white chocolate can add a different flavor profile compared to milk chocolate.
6. Make Ahead for Convenience
- Prepare the Butterfinger balls in advance and store them in an airtight container in the refrigerator. They also freeze well for up to a month, making them perfect for last-minute desserts.
7. Portion with Precision
- Use a cookie scoop to ensure uniform size and shape, which helps them look more professional and ensures even chilling.
By following these tips, you’ll create Butterfinger balls that not only taste incredible but also impress with their appearance and texture!
Storing Butterfinger Balls for Freshness
Proper storage is key to maintaining the flavor, texture, and overall freshness of Butterfinger balls. Whether you’re saving them for later or preparing them ahead of time for an event, these tips will ensure your treats stay as delicious as when they were first made.
Short-Term Storage
- Refrigerator: Place your Butterfinger balls in an airtight container and store them in the refrigerator. They will stay fresh for up to 1 week. The cool temperature helps maintain their firm shape and keeps the chocolate coating (if used) from melting.
- Layering Tip: If stacking the balls in a container, use parchment paper between layers to prevent them from sticking together.
Long-Term Storage
- Freezer: For longer storage, freeze the Butterfinger balls. Arrange them in a single layer on a baking sheet and freeze until firm (about 1–2 hours). Then transfer them to a freezer-safe container or zip-lock bag, with parchment paper between layers.
- Shelf Life: When frozen, they can last up to 3 months without losing their flavor or texture.
Thawing Instructions
- Remove the desired number of balls from the freezer and place them in the refrigerator for a few hours to thaw gradually. This prevents condensation from forming on the chocolate coating.
- For immediate consumption, let them sit at room temperature for about 15–20 minutes.
Important Tips for Storing Butterfinger Balls
- Avoid exposing them to direct sunlight or high humidity, as this can cause the chocolate to soften or bloom.
- Always store the balls in an airtight container to protect them from absorbing odors from other foods in the fridge or freezer.
By following these storage tips, you can enjoy your Butterfinger balls fresh and flavorful, whether you’re indulging right away or saving them for a later treat.
Why You’ll Love Butterfinger Balls
Butterfinger balls are the perfect dessert for anyone who loves indulgent, bite-sized treats that are simple to make. Their rich peanut butter flavor, combined with the unmistakable crunch of Butterfinger candy, creates a dessert that is both satisfying and memorable. Every bite is a perfect blend of sweet, salty, and creamy textures, making them a crowd-pleaser for any occasion.
One of the best things about Butterfinger balls is how easy they are to prepare. With no baking required and only a handful of basic ingredients, they’re an ideal choice for busy schedules or last-minute gatherings. Plus, their versatility lets you get creative—roll them in crushed nuts, drizzle them with chocolate, or even experiment with coconut flakes for a unique twist.
These treats are also incredibly convenient to store. Whether you’re refrigerating them for a week or freezing them for months, they’ll stay fresh and ready whenever you need a quick snack or dessert.
With their irresistible flavor, customizable options, and no-fuss preparation, Butterfinger balls are sure to become a favorite in your dessert repertoire. They’re perfect for parties, holiday gatherings, or simply satisfying a sweet tooth in the most delicious way possible!
Print
Butterfinger Balls
- Total Time: 15 minutes
- Yield: 24–30 balls 1x
- Diet: Vegetarian
Description
These Butterfinger balls are a no-bake dessert made with creamy peanut butter, Butterfinger candy, and chocolate coating. Simple to make and impossible to resist!
Ingredients
2 cups Butterfinger candy bars, crushed
1 cup creamy peanut butter
1 ½ cups powdered sugar
4 tbsp unsalted butter, softened
1 cup chocolate (milk, dark, or white chocolate) for coating
Instructions
Crush the Butterfinger candy bars into small pieces using a food processor or a rolling pin.
In a large mixing bowl, combine the crushed Butterfinger, peanut butter, powdered sugar, and softened butter. Stir until well-mixed and a dough-like consistency is achieved.
Scoop 1–2 tablespoons of the mixture and roll into balls. Place them on a baking sheet lined with parchment paper.
Chill the balls in the refrigerator for 20–30 minutes to firm up.
Melt the chocolate and dip each chilled Butterfinger ball into the melted chocolate, covering it completely.
Return the balls to the parchment-lined baking sheet and refrigerate until the chocolate sets, about 10–15 minutes.
Serve and enjoy your delicious Butterfinger balls!
Notes
You can store the Butterfinger balls in an airtight container in the refrigerator for up to 1 week or freeze them for up to 3 months.
Feel free to customize the chocolate coating by using dark or white chocolate, or even adding toppings like crushed nuts or sprinkles for extra texture.
- Prep Time: 15 minutes
- Cook Time: 0 minutes
- Category: Dessert
- Method: No-Cook
- Cuisine: American
Nutrition
- Calories: 180
- Protein: 4g
Keywords: Butterfinger balls, no-bake dessert, peanut butter balls, easy dessert, Butterfinger recipe, candy balls, quick treats, Butterfinger candy
FAQ About Butterfinger Balls
Absolutely! Butterfinger balls are perfect for preparing in advance. You can refrigerate them for up to 1 week or freeze them for up to 3 months. When freezing, store them in an airtight container with parchment paper between layers to maintain their shape and flavor.
If you can’t find Butterfinger candy bars, you can use other crunchy peanut butter-based candies, such as Reese’s Pieces or homemade toffee bits. While the flavor won’t be identical, the result will still be delicious and similar in texture.
If the mixture feels too sticky, it’s likely due to temperature or ingredient ratios. Chill the mixture in the refrigerator for 10–15 minutes before rolling. If it’s still sticky, add a bit more powdered sugar or crushed candy to firm it up.
While Butterfinger balls are meant to be indulgent, you can make minor adjustments to reduce the sugar. Opt for natural peanut butter (without added sugar) and dark chocolate for the coating. However, keep in mind the candy base will still be sweet.